How To Add Trust Badges To Shopify Easily

Trust is a key element for brands looking to develop a stronger, more meaningful connection with their audience.
In fact, when it comes to forming relationships with brands, consumers rank trustworthiness and reliability as the most important traits — even ahead of convenience and product quality.
Unfortunately, trust is at an all-time low, with a Havas Group survey of 395,000+ consumers revealing that just 47% of brands are seen as trustworthy.

One simple but effective way to build trust in your brand is to add trust badges to your Shopify store.
In this article, we’ll explain what trust badges are, what types of badges are available, and how you can add them to key parts of your site, including:
- Product pages
- Cart pages
- Checkout pages
What Are Trust Badges?
Trust badges are symbols or icons that demonstrate the legitimacy of your website, thereby reassuring consumers that you aren’t going to rip them off or misuse their data.
These badges come in several “flavors.” All have the same ultimate goal — proving that you’re reliable and trustworthy — but they achieve it in different ways. In the next section, we’ll round up the five broad types of trust badge…
Best Trust Badges for Shopify Stores
Pro tip: See our related guide: Trust Badges for E-Commerce: 10 Types You Can’t Ignore.
Safe Checkout Badges
Safe checkout badges demonstrate the safety of your Shopify store’s checkout process.
One of the most popular — and trusted — varieties is the Norton seal, which is seen almost 100 million times a day by customers in 170 countries. Nine in 10 customers are likely to continue an online purchase after seeing the seal during the checkout process.

However, it’s not the only form of safe checkout badge. Other common examples include the PayPal seal and the TRUSTe badge.
Accepted Payment Badges
According to the Baymard Institute, 19% of shopping cart abandonments happen because customers don’t trust websites with their credit card information, while a further 9% are prompted by insufficient payment methods.
So it makes sense to add payment badges — such as Visa Secure and American Express SafeKey — to your checkout pages.
![]()
Third-Party Endorsements
Adding third-party endorsements to your Shopify store is kind of like getting a seal of approval from the cool kid at school: they’ve vouched for you, so everyone else should dig you, too.
Once again, there are various types of third-party endorsements, including:
- Better Business Bureau accreditations
- Client logos
- Recommendations from professional bodies
- Industry awards
- Media placements
These trust badges are particularly helpful for Shopify stores with unusual products or more complex business models.
For instance, fashion subscription box service SprezzaBox has added a bunch of high-profile media logos to its homepage to reassure customers it’s won’t steal their money:

Free Shipping and Returns Badges
Offering free shipping and returns is one of the most effective ways to boost conversions.
Indeed, Retention Science found that conversion rates for free shipping offers are twice as high as for “percentage-off” price discounts.
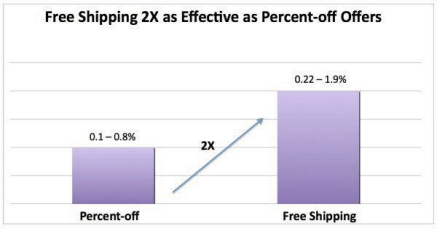
So it’s no surprise that many e-commerce stores add their own free shipping and free returns trust badges in prominent places across their websites. For instance, furniture brand Burrow includes a “free & fast shipping” badge on its homepage:
![]()
Money-Back Guarantee Trust Badges
Money-back guarantee and risk-free trial badges are exactly what they sound like: a promise that if the customer isn’t totally satisfied with their purchase, you’ll issue a full refund within a set period.
This type of trust badge is particularly effective for retailers selling high-ticket products (think appliances, furniture, electronics, and more).
Mattress brand Casper promotes its 100-night risk-free trial on its homepage…

…and also on individual product pages:

Are Trust Badges Effective?
Trust badges are an effective way to prove the legitimacy of your Shopify store.
The Baymard Institute has carried out repeated, large-scale studies of checkout usability, consistently observing that:
“Any parts of a checkout page with trust badges, reassuring microcopy and a general visual ‘robustness’ are often perceived as being ‘more secure,’ while parts without these visual clues inspire less confidence.”
However, Baymard found that not all trust badges are equally effective.
Norton’s SSL seal was rated as overwhelmingly the most trustworthy badge, followed by Google Trusted Store and the BBB.
Interestingly, the researchers also included a fake and entirely meaningless trust badge — and it outperformed several established SSL seals:
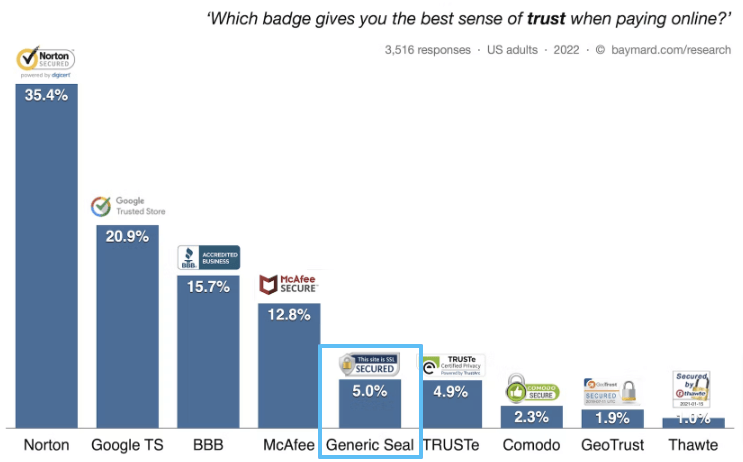
This suggests it doesn’t matter too much which trust badge you choose. Rather, consumers simply look out for some sort of visual clue that a site is robust and trustworthy.
So we know the different types of trust badges you can choose from, and we know they work. Now, let’s talk you through how to add them to various parts of your Shopify store…
Learn How to Double (2X) Your Shopify Sales with Product Labels
-
Boost sales by highlighting key features with product badges
-
Increase conversions by promoting scarcity, urgency and social proof
-
Sell more with targeted promotions to increase average order sizes
How to Add Trust Badges to a Shopify Product Page Using the Product Description
The easiest way to add trust badges to your product pages is by editing the page and pasting a trust badge image.
This simple method doesn’t require any coding; just click the image button within the CMS and paste your trust badges:
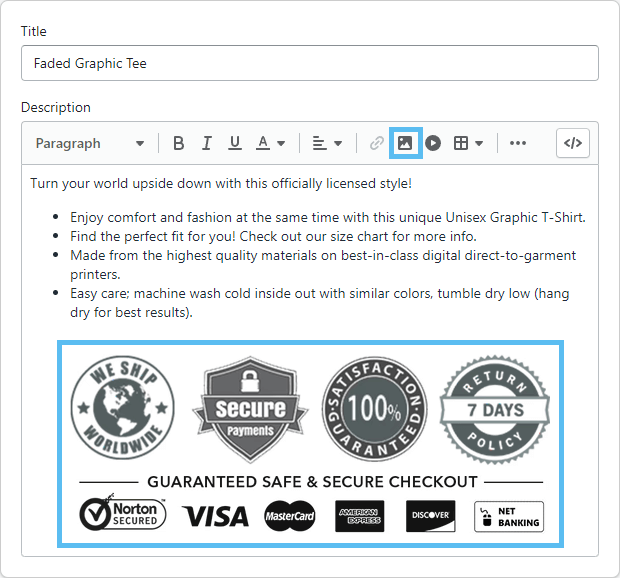
That’s it!
How to Add Trust Badges to a Shopify Product Page Using Liquid Code
The simple copy-paste approach is fine if you just want to add trust badges to a handful of products.
But it’s a huge, time-consuming headache if you’re duplicating badges across hundreds, or thousands, of Shopify product pages.
If you don’t want to do it all manually (and who would?), one option is to use Liquid, Shopify’s templating language.
We’ll demonstrate the process for adding trust badges to Dawn, one of the most popular Shopify themes:
Step 1. Go to Your Settings Page and Press “Files”
- Login to your Shopify dashboard then navigate to Settings and click Files.
Step 2. Upload Your Trust Badge
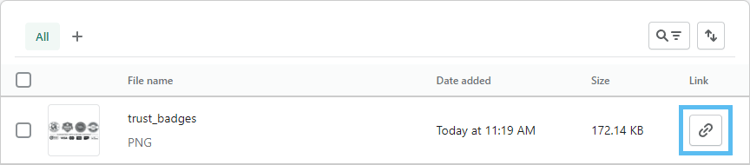
- Upload your trust badge by clicking Upload Files.
- You’ll need the image URL later on in this process, so copy it by clicking the Link button.
Step 3. Edit Your Theme
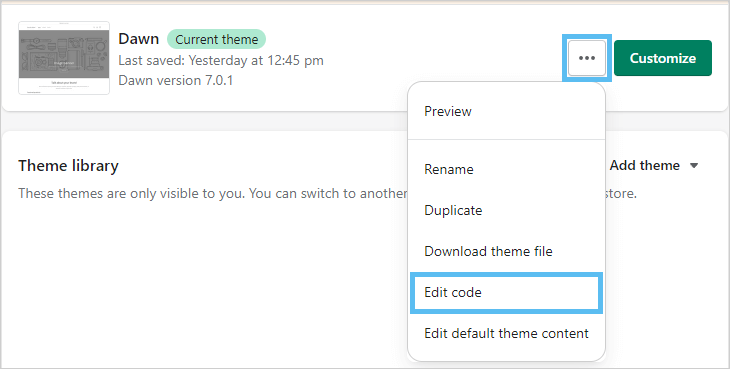
- Navigate to Online Store > Themes.
- Remember to backup your theme before making any changes.
- Click Actions (the ellipsis button) > Edit code.
Step 4. Go to Your Product Page Code
- Find your product page code by navigating to Sections > main-product.liquid.

Step 5. Edit the Code
Finally, add the following code snippet to your theme, pasting the URL you copied during step #2 into the image src:
<img src="Replace_with_URL_from_step_2" alt="Trust Badge" style="max-width: 100%:">Paste the modified code snippet into the spot you want it to appear on your product page.
For example, adding the code to line 362 of our dummy product page…
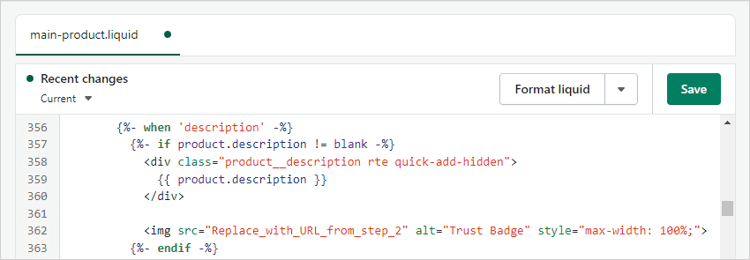
…would result in the trust badges appearing as follows:
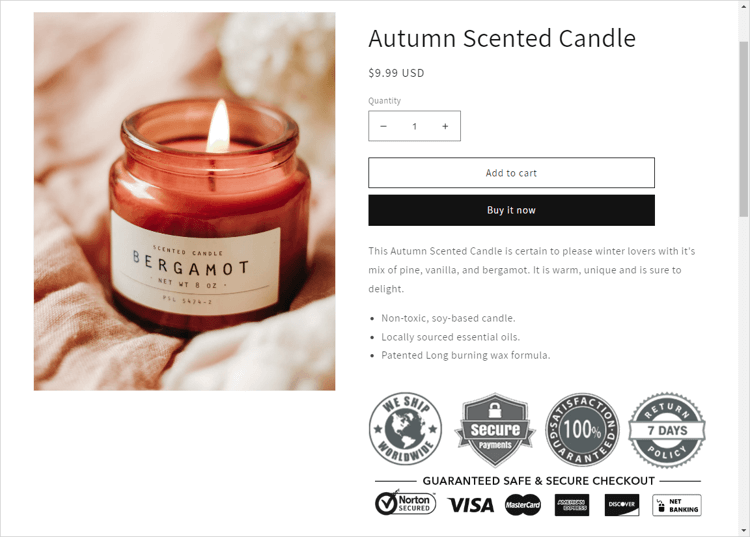
Play around with your code placement until you find the best fit for your chosen Shopify theme.
How to Add Trust Badges Under “Add to Cart” on Shopify Product Pages Using Liquid Code
You can use the previous section to add a trust badge anywhere on your product page using Liquid.
But follow these steps if you specifically want your badge(s) to appear beneath the Add to Cart section of your product page.
Again, we’re using the Dawn theme to show you how this looks.
Step 1. Go to Your Settings Page and Press “Files”
- Login to your Shopify dashboard then navigate to Settings and click Files.
Step 2. Upload Your Trust Badge
- Click Upload Files (top right) to upload your trust badge of choice.
- Again, don’t forget to copy the URL — you’ll need it later.
Step 3. Edit Your Theme
- Navigate to Online Store > Themes to edit your theme.
- Don’t make any changes until you’ve backed up your theme.
- Click the Actions (ellipsis) button > Edit code.
Step 4. Go to Your Product Page Code
- Navigate to Sections > main-product.liquid.
Step 5. Edit the Code
Paste the following snippet of code into your theme, remembering to edit the image src with the URL you copied back in step #2.
<div class="product__description">
  <img src="Replace_with_URL_from_step_2" alt="Trust Badge" style="max-width: 100%:">
</div>
Add your modified code into the relevant location on your Shopify product page — so placing it on lines 642 – 644 of our dummy page…
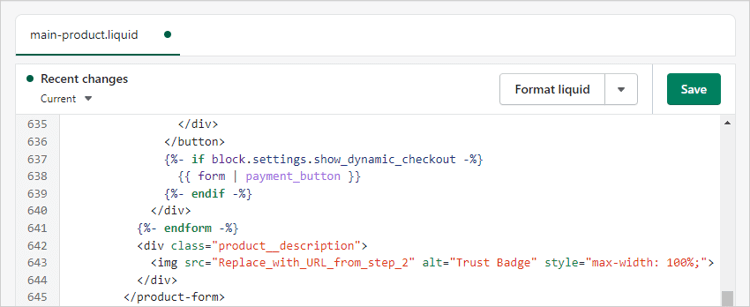
…would result in our product page looking like this:

How to Add Trust Badges Under “Add to Cart” on Shopify Product Pages Using a Shopify App
Admittedly, not everyone loves the idea of editing code.
If the previous sections seem like too much hard work, don’t worry — you can add trust badges without messing around with code by using an app such as:
How to Add Trust Badges on the Cart Page Using the Shopify Theme Customizer
Adding trust badges to your Shopify cart page can help to reduce abandonments. And fewer cart abandonments means more sales and revenue.
Here’s how to make it happen using Shopify’s Theme Customizer, demonstrated through the Dawn theme…
Step 1. Edit Your Theme
- Navigate to Online Store > Themes to edit your theme.
- Make a backup of your theme before making any changes — better to be safe than sorry!
- Click Customize.
Step 2. Go to Your Cart Page
-
Press the Add section button.

-
Click Image banner.
-
Hide your image’s text, details, and buttons by clicking the eye icon next to each.
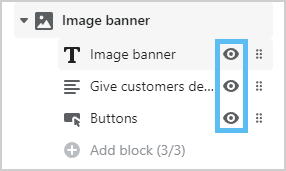
-
Click **Image banner **again…

-
…and select or upload your desired trust badge under First image.
-
Tick the box marked Adapt section height to first image size.

Check out our Shopify image optimization guide for more tips on how to optimize your images.
How to Add Trust Badges on the Shopify Cart Page Using Liquid Code
The Shopify Theme Customizer isn’t the only way to add trust badges to a Shopify cart page; you can also do it with Liquid code.
Here’s how (once again, we’re using the Dawn theme for our demonstration)...
Step 1. Go to Your Settings Page and Press “Files”
- Do it!
Step 2. Upload Your Trust Badge
- Press the Upload Files button in the top-right corner to upload your trust badge.
- Click the Link button to copy your trust badge URL.
Step 3. Edit Your Theme
- Navigate to Online Store > Themes.
- Backup your theme before you start editing.
- Press Actions (the ellipsis button) > Edit code.
Step 4. Go to Your Cart Footer Page Code
- Navigate to Sections > main-cart-footer.liquid.

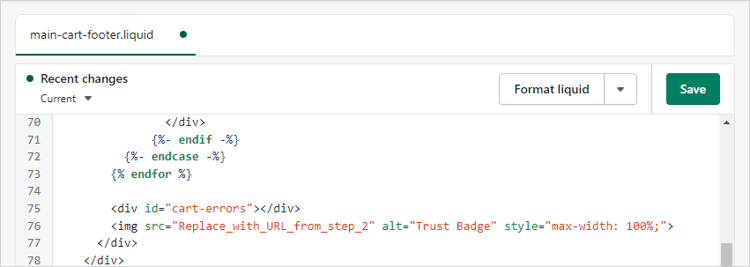
Step 5. Edit the Code
Add the URL you copied during step #2 into this code snippet…
<img src="Replace_with_URL_from_step_2" alt="Trust Badge" style="max-width: 100%:">…then paste the snippet into the relevant part of your shopping cart page.
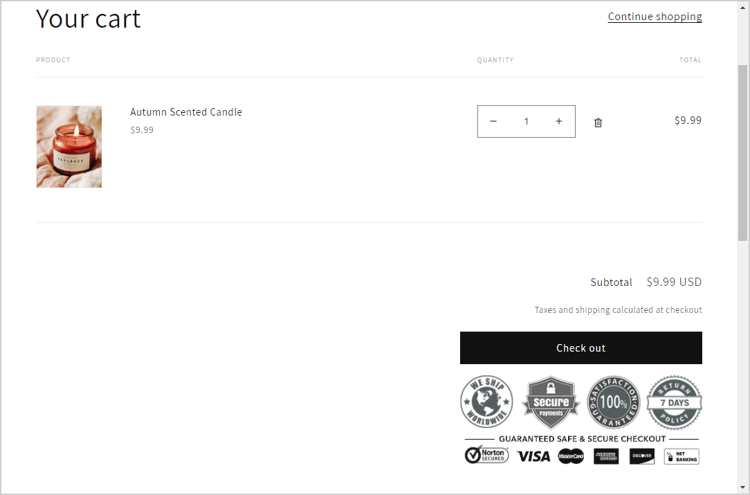
For instance, if we paste the code into line 76 of our dummy page…
…we end up with a shopping cart page that looks like this:
How to Add Trust Badges on the Checkout Page
We’ve explained how to add trust badges to your product and shopping cart pages.
Now, let’s repeat the process for your checkout page, again using the Dawn Shopify theme and Shopify’s Theme Customizer…
Step 1. Edit Your Theme
- Go to Online Store > Themes to edit your theme…
- …remembering to backup your theme before making any changes.
- Click Customize.
Step 2. Go to Your Theme Settings
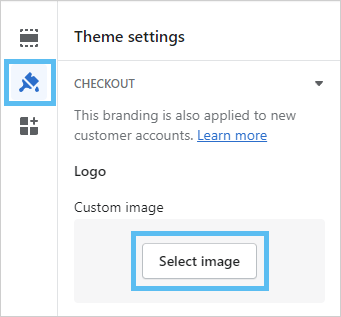
- Click the theme settings icon.
- Navigate to Checkout > Logo and click Select image.
Step 3. Select Your Trust Badge
-
Select or upload your chosen trust badge.
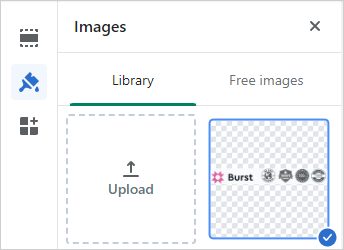
-
Click save and you’ll end up with a checkout page that looks something like this:

How to Edit the Shopify Payment Methods in the Footer
Here’s one more tip for you:
It’s possible to add all your available payment methods to the footer section of your Shopify store — meaning it’ll show up on every page with a footer.
Here’s how to do it…
Step 1. Edit Your Theme
- Click Online Store > Themes to edit your theme.
- Make a backup of your theme before making any changes.
- Click Customize.
Step 2. Go to Your Cart Page
- Navigate to your Cart page.
Step 3. Edit Your Footer
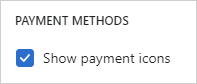
-
Click Footer.

-
Scroll down to Payment Methods and tick the box marked Show payment icons.
Other FAQs
Where Do You Put Trust Badges?
Trust badges should be added to prominent positions throughout your Shopify store, including:
- Product pages
- Cart pages
- Checkout pages
You can also add payment methods to your website footer. And many e-commerce stores even add free shipping badges and third-party endorsements to their homepage and key category pages.
Final Thoughts
Trust badges are a smart way to prove your Shopify store is legit. When new visitors trust your site, they’re more likely to convert — and higher conversion rates have a huge impact on your bottom line. For a store with 10,000 monthly visits, a 1% increase in conversion rate equates to an extra 1,200 transactions a year.
Want more advice on turning visitors into paying customers? Check out our top 25 tips for increasing Shopify conversion rates.

Grow Your Shopify Sales by over 175% with Flair
-
Increase sales using product badges and sales banners
-
Maximize conversions with scarcity, urgency and countdown timers
-
Automate promotions with targeted rules and scheduling